:max_bytes(150000):strip_icc()/diy-shop-implements-1-6941018c55e04cfab2c64ec6fddc8841.jpg)
Farmers are pros when it comes to finding their own solution to problems. Here are four of the best farmer-built shop implements you can construct, each designed to fill a specific need.
Super-size tool bench
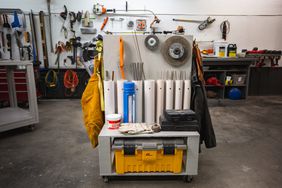
The need to make both tools and benchtop space more accessible and close to work projects has grown with the size of farm shops. This has inspired farmers to build a wide variety of work and tool benches on wheels.
One of the most extensive and most complete of such rolling work and tool benches featured in Successful Farming magazine was the creation of the engineering genius of Michael Blake and Dustin Harrison, who farm near Aurelia, Iowa.
:max_bytes(150000):strip_icc()/super-size-tool-bench-farmers-5bb33a2763d14aa7b60e852eb4a64f6a.jpg)
"We got tired of walking back and forth across the shop to get tools when working on big projects," Blake says to explain the need that inspired the rolling bench. "We had kept our tools on a typical stationary work and tool bench before, which was along the wall in our old shop."
- READ MORE: 4 shop tool breakthroughs
The project to create this 4-foot-wide by 16-foot-long storage implement began with the welding of a bench frame made of 2-inch square tubing. "The worktop is 3⁄16-inch steel plating welded to that frame," Blake points out.
A bottom shelf was added using tube steel and old hog floor grates. The bottom shelf strengthens the frame, and the hog grates are strong enough to hold heavy tools such as floor jacks and large boxes of tools.
The hog floor grating was welded to the bottom of the 2×2-inch tube shelf frame. This created a lip that prevents tools or toolboxes from sliding on the bottom shelf.
:max_bytes(150000):strip_icc()/super-size-tool-bench-0ce95214c1c8400f86c3922a8b47e4a6.jpg)
The tool wall for the portable bench was salvaged from the tool wall that hung in their old shop. "This comprises two pieces of ¾-inch-thick plywood screwed back to back," says Blake.
The bottom of the wall is nestled between angle irons (located on both sides of the bottom of the wall) that were welded to the benchtop. Bolts passing through the angle iron hold the bottom of the tool wall in place.
- READ MORE: 10 tips that can advance your welding skills
For extra strength, the farm team welded the bottom of a piece of strap iron to the benchtop. This vertical support is located on one side of the wall and at either end. That strap iron runs at an angle up to the tool wall where it is bolted in place.
The unit rides to work on 4-inch-diameter castering wheels. "The whole rack was built for a fraction of the cost of buying a rolling commercial toolbox," Blake says. "With it, all our hand tools are in the open for fast identification. I believe it has encouraged us to put tools away, too."
Besides being able to move tools where they are needed, the bench does provide some work space to handle smaller repair items.
Enclosed lubrication center
Over the years, Successful Farming magazine has shown you dozens of different approaches to storing lubricants in farm shops. The best overall design was designed and built by Lance Rezac, who farms with his brother, Tom, and their families near Onaga, Kansas.
"This started out as a 300-gallon fuel tank that I cut in half and topped off with a grate to catch oil drips," Rezac explains. "Then I got to thinking that I could construct cabinets above that tank to hold bulk oil, oil barrels, and jugs, and then put in shelves to store funnels and fill cans, as well."
- READ MORE: Farm hacks, tips, and tricks
Rezac set about building cabinets from ¹⁄8-inch sheet metal to enclose not only the area above the drain tank but also the storage cabinets on either side of the drain tank. The frame for the cabinets was made from 2×2-inch square tubing and provides strength to hold two bulk storage containers for diesel engine and hydraulic oil accessed through two drain lines. The cabinet to the right provides storage for two 55-gallon barrels of specialized lubricant. The cabinet to the left holds small containers of lubricants, coolant, and other tools.
:max_bytes(150000):strip_icc()/103283372-2000-5803d259a75a46af986f0a019de60659.jpg)
"I wanted everything that is oily or greasy to go in here," says Rezac, referring to his cabinets. "Grease guns, used oil filters, funnels. We turn them all upside down and let them drain. Everything stays dust-free behind the cabinet's piano-hinge doors. They are easy to open, easy to close, and don't require any latches. That's because the fronts of cabinets lean back at about a 5° angle. When the doors are closed, they stay closed."
Anything that drips lubricant stored in any of the cabinets is caught by pans and flows into the grate-topped fuel tank, which holds waste oil to be pumped outside to a storage tank.
Vertical rack saves space
Successful Farming magazine has illustrated a fleet of metal storage racks in all sizes and configurations. While all those farmer-built storage frames have merit, one of the most convenient – if not the largest – rack to be featured was a creation by Doug Repp. What differentiates the Minburn, Iowan's invention is that it offers hundreds of feet of storage while taking up around 60 feet of floor space.
:max_bytes(150000):strip_icc()/vertical-rack-2000-b28fadaa7ced45b9ad15d2f525a93911.jpg)
Overall, the rack is more than 16 feet tall (nearly reaching the 16-foot sidewall of Repp's shop), and it stretches out 22 feet to readily accommodate long lengths of fabricating steel.
With this design, the entire weight of the rack and its contents are placed on the floor, Repp points out. True, the top of the rack is attached in two locations to the shop wall, but these attachments primarily provide stability. The surface of the rack is tipped back at roughly a 10° angle. The rear struts extend up roughly 10 feet to the back of the rack. This triangle works to extend the weight of the racks and its steel to the floor. "I store heavy steel on the bottom half of the rack to concentrate the weight lower to the floor," Repp says. "The rack was designed so a forklift can place and take pieces of steel from the higher levels of rack. I can easily store steel that I don't use often in the upper levels of the rack. Plus, all my steel supply is visible, so I can readily account for inventory."
- READ MORE: Farmer-tested tools
The rack was fabricated from 2×4-inch tubing with ¼-inch sidewalls. The storage shelves were created from pieces of 1×2-inch C-channel that are approximately 11 inches long. Repp welded cross supports between the front and rear frames to create additional interior storage space for steel-length odds and ends. "If there is something light on the top, I can crawl up shelves like ladder rungs and also pick up light pipe or flat irons," Repp adds.
Metal center on wheels
When the Nelson brothers – Neal, David, and Dennis – finished out their 80×80-foot shop several years ago, they considered the sizeable floor space it offered and realized they had to make as many of the implements used in the building as portable as possible. That was certainly the case with the metalworking center created by Neal Nelson.
Prior to farming, Nelson had worked in a factory and learned a lot about reducing setup time on projects. "We decided to put all but our MIG welder (which was already on wheels) on a portable bench that we could roll up next to welding repairs or major fabrication projects," he says.
- READ MORE: Mechanic must-haves for farm shops
Nelson used salvaged 3-inch square tubing to create the welding table. In fact, most of the materials for the table came from the salvage yard on the brothers' Belmond, Iowa, farm. The table's top and bottom shelves were decked out with ¹⁄8-inch-thick steel plating.
One of the handiest innovations in the do-it-all portable welding center is a well in the center of the tabletop. This provides space for a metal chop saw positioned so its cutting platform is flush with the welding table's top. Two large rollers, salvaged from an old square baler thrower, are positioned on either side of that chop saw. Additional rollers are found at either end of the tabletop. These rollers work in concert to position steel for precise cutting by the saw. "This is a nice feature, as we can easily move steel back and forth for precise and repeatable cutting," Nelson adds.
:max_bytes(150000):strip_icc()/101867374-2000-c70bd5009c454572b07e3ca496cc86cf.jpg)
The brothers' plasma cutter is stored on the right side of the table under the work top. A stick welder and an oxygen-acetylene cutting torch are stored at the other end of the work center.
Nelson created a unique slide-out cord and welding lead rack located behind the stick welder and cutting torch. Under the chop saw, he is building a cabinet that will hold all welding supplies and tools. All clamps hang from a rod added next to the plasma cutter.
"With the center, we can roll everything needed for metal fabrication right up to the job, which saves us considerable time either positioning machinery near a permanent welding table or walking back and forth to and from a repair," he notes.
Enhancements for the work center include hard-wiring it for 220-volt access. This allows the brothers to plug in tools like grinders at the work center rather than having to use a wall plug. Nelson is considering adding a fold-out downdraft air-handling unit to remove welding fumes.
Detailed plans of these shop implements
You can download detailed blueprints and construction instructions for all of the shop implements featured on these pages here:
- READ MORE: Top shop plans
